Richard A. Clarke, the former US National Coordinator for Security, once said, “If you spend more on coffee than on IT security, then you will be hacked.” The statement seems relevant in the current scenario. And there’s a good reason for that.
According to the latest statistics, between 2023 and 2027, online payment fraud is projected to reach a cost of $343 billion for businesses. Moreover, e-commerce fraud is estimated to cost the global retail sector at least $48 billion in the following years.
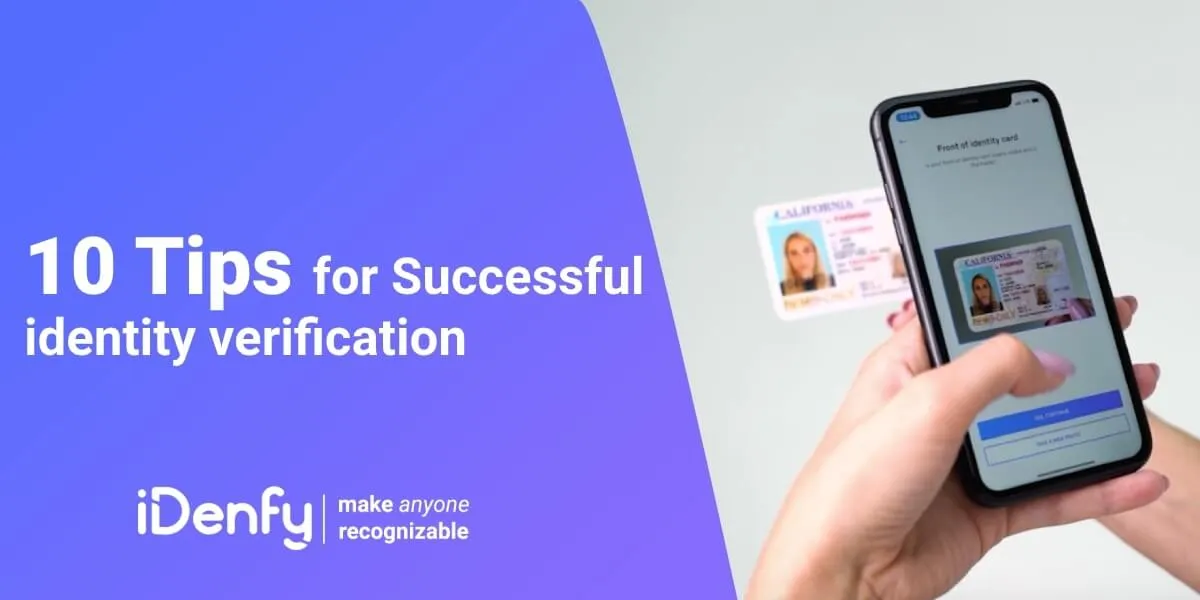
At iDenfy, we let you verify your identity quickly and securely from the comfort of your home. While identity verification with iDenfy is straightforward, some novices make mistakes, resulting in unsuccessful identity checks.
Prior to completing a verification check or simply attempting the verification process, it’s important to understand the company’s specific verification requirements fully. Certain businesses may request particular documents, so it’s crucial to have them available.
Below, we have compiled ten tips to help you complete the identity verification with iDenfy successfully.
Note: We do not verify customers’ identities through email due to data privacy regulations.
Related: Top 5 Identity Verification Measures [For Beginners]
How to Complete the Identity Verification with iDenfy?
The Know Your Customer (KYC) verification process consists of a few important steps. Make sure to:
Automate your identity verification
See how iDenfy helps 1,000+ companies verify customers in seconds with AI-powered KYC.
Explore iDenfy1. Use Your Full Legal Name
Even if you have a fancy nickname matching your personality, you need to use a full legal name. When registering on any of the platforms, remember that your name should be as it is in the actual ID document. Write spellings carefully.

2. Ensure Good Lighting
Maybe low-light photography is a trend that many like for their social media pictures. However, for us, good lighting is essential to review your facial details. Therefore, make sure you’re in a well-lit area. Don’t forget to ensure that your device is equipped with a high-quality camera and maintains a stable internet connection.
Dark rooms and background light can make it difficult for us to see your face. It’s a very common error, but be aware that lighting should be in front of you (not behind) so that the picture is visible. Besides this, try to keep your face in the white frame. Don’t wear glasses, headphones, masks, etc.
If the picture is blurry or dark, click on the ‘Retake’ button to try again.

3. Be Quick But Don’t Hurry
Come on. You’re not participating in the Olympic race! As harsh as it may sound, you don’t need to lose your inner peace. So take your time. You have 10 minutes to complete the verification process before the session closes. Just have your ID document ready so that you can show it immediately. Follow all the instructions carefully, as the software will tell exactly what to do and how to move your head if needed.

4. Use a Good Camera and a Good Internet Connection
Sometimes, terrible camera quality and low internet speed are the culprits of a failed verification. In fact, the majority of verification failures occur due to poor camera or internet quality. Unfortunately, an old smartphone with a low-quality camera can impact your picture’s quality. If you have a high-end device but still face a picture quality issue, check the lens. Sometimes, the lens is dirty.
Apart from this, don’t forget to check your internet connection. Do not refresh the browser during the verification process. This will help you complete the verification more smoothly.
To complete the identity verification with iDenfy, you need to capture your ID document and your face. It will only take 30 seconds or less! For the best results, complete the verification process independently and without interruptions. Remember, this is a voluntary process, and no one can compel you to go through with it.
It depends on where you found our solution integrated, but sometimes, especially when using a desktop/laptop device, you may be asked to download our app as an alternative method. That will help you with a simpler verification process.
Just enter an eight-digit code displayed in the web browser, then choose your document’s issuing country and document type. See — it’s a straightforward process, even for a novice.
Note: We advise using the Chrome browser for Android and the Safari browser for iOS devices. Avoid Chrome on iPhones.
Related: Identity Verification vs Identity Authentication: The Key Differences Explained
5. Go Through Verification On Your Own
Our remote identity verification system is more secure than face-to-face verification. However, we don’t deny the act of coercion in identity verification. Generally, it happens with older adults. We understand that technology is not their cup of tea. Sometimes, they need friendly assistance.
Nevertheless, friendly assistance is one thing, and coercion is another. If we doubt or notice any sign of threat, we strictly reject such a verification. It’s only natural that completing the ID verification process in isolation is safer because it reduces the risk of unauthorized individuals gaining access to your personal data or attempting to influence the process negatively.
6. Have a Valid ID
At iDenfy, we accept different types of ID documents for verification. You can submit your passport, ID card, driving license, or residence permit. However, your ID document should not be dog-chewed or personalized with the drawing of your loving kids. We don’t accept physically damaged ID documents. In other words, please make sure that your ID is neither expired nor physically compromised. The system automatically detects forged documents, as well as altered copies and similar renderings that bad actors use to bypass KYC.
7. Choose the Right Document Type
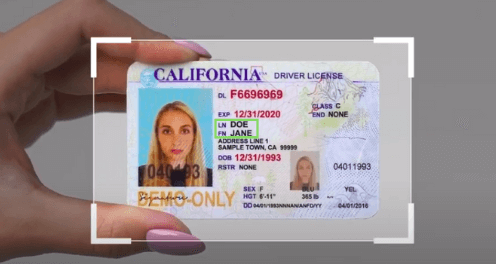
To not mess anything up right from the start, select the correct ID document type for the verification. You can easily understand when the document type is wrong. If you’re using an ID card or a resident permit, you’ll need to take a picture of both sides. On the other hand, for a passport, capture the page that contains your details and photo. Ensure the entire page is in view, including the machine-readable zone (MRZ) located at the bottom of the page. Moreover, choose a legit ID document that has all its corners visible in the frame.
8. Capture Passport Carefully
Since passports contain several pages, people get confused about which page they need to capture. Capture the main page that includes your picture and details such as name, date of birth, and passport number. In short, you need to capture your photo and the entire MRZ that encloses your personal data.
9. Take a Picture of Both Sides if required
Don’t forget that ID documents and residence permits have essential information on both sides. So, kindly capture both of them. Don’t worry, it’s simple, just follow the provided instructions.
10. Take Sharp Photos
You must click a sharp picture of your ID document. Apart from this, make sure the light reflection on the document or your fingers doesn’t hide the key information that you need to provide. If the ID is blurry or unreadable, kindly retake the photo. Ensure your ID document fits the white frame (the edges of the document are as close as possible to the frame).
If you fail to verify yourself, you’ll need to get a new link for verification.
The verification process takes ten minutes. However, our KYC experts typically manually review your personal details and verification results in between one and ten minutes. We’ll notify you once we verify your identity.
Related: How to Improve KYC Verification? Tips For a Frictionless User Experience
If your identification gets rejected for any reason, contact our support team by sending an email to [email protected].
For more information about iDenfy and our ID verification solutions, feel free to book a free demo.